It’s been an interesting and challenging month for Joe’s laptop. I write this in December of 2020. Just off the top of my head, I purchased my HP notebook in 2015 or 2016, with Windows 7 home installed. Along the way, I took the free upgrade to Windows 10 but didn’t do anything major besides that.
Over the last few months, I’ve run into more frequent problems with my Toshiba mechanical hard disk drive. Very slow disk access, lots of drive errors and running chkdsk. I knew it was just a matter of time before a catastrophic failure and started thinking about options. At the end of this whole process, I decided to document via this webpage and hopefully save someone else all the searching I had to do.
High on the list was replacing the HDD with a solid state drive (SSD). Some initial research showed that it could be easily done so my thoughts turned to getting the data from the old drive to the new drive. My first thought was mirroring the drive within the operating system but that option didn’t appear in the home version of Windows. That left cloning as the best choice. More research, checking reviews, etc. I purchased a disk duplicator and a 1 TB SSD that met my needs and budget.
The day arrived when the hardware was available and I had enough time for the cloning operation. Naturally, I had to do a quick YouTube check for accessing/removing the HDD in the notebook but in the days that followed I had that process down pat. The first few attempts to clone in the disk duplicator failed, with only an error light to indicate the problem. The website for the duplicator didn’t provide any useable information and I came to the conclusion that the operation failed due to bad sectors on the source disk.
On to plan B. Since the hardware couldn’t do the job, I started looking at software solutions, hopefully free. Well, I was out of luck on the free part but found great reviews and a decent price for EaseUs Disk Copy so I paid up and downloaded. The disk duplicator still came in handy as a docking station for the SSD. At this point, I’d like to point out that I was operating without a safety net – in the form of backups. My recent attempts to backup data all failed and in the process I removed the older backups, trying to make more room on my external drive.
EaseUs did the trick, although not immediately. It needed to create and boot into a WinPE environment but after that I had a good clone of my HDD. I tried to verify using Windows Disk Management. It showed the drive and the partitions but said the drive was offline. That made little sense to me since it was connected and showing partitions so it was back to Google. Seems like it was offline because it shared a drive ID with the original drive. If I just forced it online, a new drive ID would be assigned. I did that and verified that my C drive did indeed look like the original. I quickly powered everything down and swapped out drives. A huge groan followed as the new SSD would not boot. I put the original back in and started researching my latest problem.
Apparently, that drive ID is very important in the boot process of a computer with UEFI bootup. I re-cloned the SSD and opted NOT to verify anything after the process completed. Just swapped out the drives and it booted up with only 1 prompt during the boot sequence that I just had to hit enter. The second or third boot after that, though, HP did a system repair. I thought that was very odd and also noticed something else that was strange.
The only icon in my system tray that would respond was the OneDrive icon. I fought with that problem for days and finally, after searching the events log, determined that I was missing a file named QuickActions.dll in C:\Windows\ShellExperiences. Fortunately, I hadn’t made any changes to my original hard drive so I was able to plug it in and get the file. Big sigh of relief when I had access to working icons again.
On to the next issue. I wanted to use Windows Backup again to create a new system image and alternate between that and the cloning process for insurance. Throw in regular Windows documents backup and it should be bulletproof. Except the Windows system image failed. Every. Damn. Time. (Right about this point, I ordered another 1TB SSD for cloning purposes.) I kept getting an error parsing an XML file. I tried numerous suggestions found on the internet and none helped. Until I found someone talking about this exact problem after cloning a drive with EaseUs.
Enter GPT fdisk (https://sourceforge.net/projects/gptfdisk/
Someone else far more talented than I discovered the actual problem. When EaseUs created the clone, it randomly applied very strange characters to the partition names. That’s what was crashing the system image backup process, when trying to write/read an XML file. Windows does not provide a method to rename those partitions, at lease none that were readily identifiable. The solution suggested by someone else on the Internet was to use GPT fdisk to rename. After downloading and unzipping the required files, here’s the process I followed.
Open a command prompt with admin privileges. CD to the folder where I extracted the files. Invoke the proper version of the program. Since my laptop is 64 bit, I ran
gdisk64 -l 0:
The zero and colon make the first fixed drive on the system active for the program. Here’s a screen shot of the information that provided.
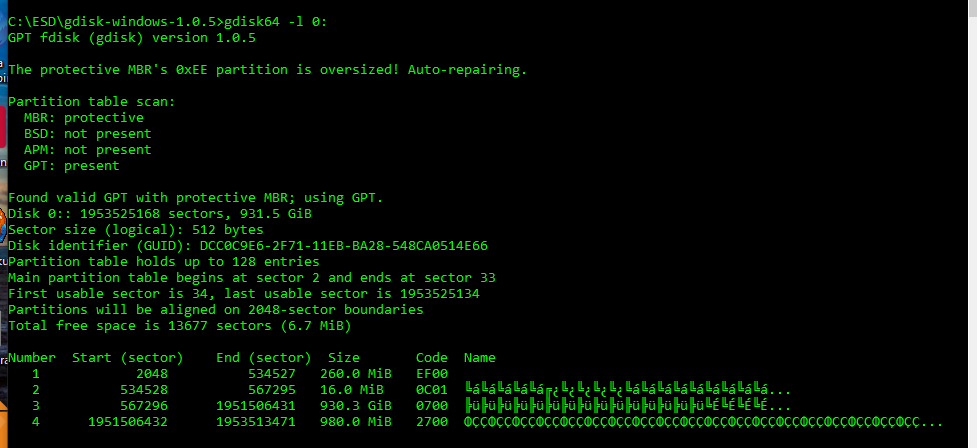
That first command exits the gdisk64 program immediately after displaying the information. After digesting and saving this info, I went back in and issued a series of commands.
gdisk64 0: (to start the program with the only fixed drive active)
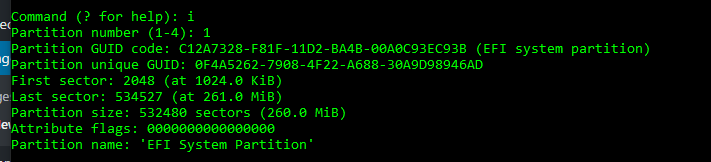
i (enter, program will prompt you for partition number)
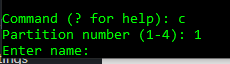
c (enter, program will prompt for partition number and new partition name)
Repeat this process for each partition. You’ll notice that when displaying the information for each partition there’s a line for Partition GUID code that has a simple name at the end. That’s what I used for the partition name.
w (enter. This writes the changes)
q (enter. This quits GPT fdisk)
Reboot your computer and you should be able to run Windows System Image backup now.
My current backup plan will follow this scheme:
Week 1: Clone spare SSD
Week 2: Windows documents backup
Week 3: Windows system image backup
Week 4: Windows documents backup
The only drawback to this is that each Week 1 I’ll probably have to redo the partition names. But at least now I have a procedure documented.
And now, Android app writing
Earlier this year I decided to write an Android app. I initially thought it would be easy peasy, just find an existing program and modify it for my purposes. Well, that was way wrong. Seems like Android apps are written in either Java or Kotlin. I have no experience with either so I opted to try Kotlin on the assumption that it was designed specifically for Android. I spent a few months taking online tutorials and finally thought I was ready enough. Wrong again. The database part was easy but everything else around it was giving me fits. Suffice it to say that I borrowed a lot of sample code and somehow managed to make it all work. 2 big discoveries along the way.
First, creating a database in sqlite studio didn’t work for Android. I finally had to create the database using command line tools from sqlite.org. After that I could modify all I wanted with studio.
Next, Kotlin does NOT allow global variables, at least not declared as such. This was pretty important for a certain function in my app. After looking at several possible workarounds, I finally posted something in a FaceBook Kotlin group. Voila, the answer given there was a Singleton Object. I had to search a little more for sample usage but that got me over a major hump.
Adventures in website creation!
After the Android app was stable, I looked around for another project. One of the problems I frequently face is finding propane while traveling across the country. More precisely, finding the lowest cost propane in an area. It’s one of those commodities that isn’t heavily advertised. There’s a very popular app to find gasoline and diesel prices but nothing similar for propane. Actually, that popular app also has a search function for propane but it fails to list propane prices, whether it’s just cylinder exchange, or whether they have the capability to fill motorhome tanks. Since I didn’t want to write an app that only ran on one platform, I opted for a website. Challenge accepted!
I’ve only done very basic websites prior to this but I assumed the layout would be relatively simple. Beyond that, I’m fairly well versed in databases so I thought it would be a piece of cake. LOL. A very basic website came together pretty quickly. I had to find some key pieces of sample PHP code to interact with the database but I had a functional site available in short order. In order to add a new propane refill station, users had to fill out a web form providing me the information to add to the database. One of my big concerns was database hacking and this process avoided that.
I also needed a way for users to report prices and that proved to be more difficult. I already had pages to show all stations (sorted of course) and by zip code. I added an Edit button to each station but then couldn’t figure out a way to grab the station id and use that in a new form. I can’t remember how many weeks I banged my head against the wall trying to figure it out. One day, as I was still flailing away with solutions that didn’t work, I noticed the URL on the page I redirected to. Lo and behold, the information I needed was right there. A part of the URL read ‘edit=nnn’, with nnn being the station id. After verifying that it updated as I selected different stations, I just had to figure a way to get that value from the address line to PHP. Again, this was way out of my wheelhouse and Google searches weren’t very helpful. I stumbled across PHP super globals during my searches and found that $_SERVER[‘QUERY_STRING’] would get the info I needed. (Weeks later, while researching a different problem, I discovered I could also use $_GET, which was a little simpler.)
The next major function I needed to add was a visual Google map with markers for the stations. That meant I now needed to familiarize myself with JavaScript. More weeks went by while I tried to integrate JavaScript maps API with my PHP driven database. Or at least I thought I needed to do that. I was really wearing out my Google search engine trying to add a map without JavaScript and the answer finally materialized. It was buried pretty deep in the results but if you need a map without all the JS, search for <gmp-map> and <gmp-advanced-markers>. Holy cow, those divs really made it simple. I just had to insert some php into each line for the info from the database and a major weight was lifted from my shoulders. I was no longer totally list-based. I now had a visual for all the folks who prefer pictures.
On to the next item on the wish list – getting the user’s location and using that to center the map. Based on my previous map coding searches, I wasn’t surprised that all the results coming back were based on JavaScript code. I bit the bullet this time and used the sample code I found. The big problem with all that sample code was that it just displayed the user’s latitude and longitude in an HTML form. That was unusable for my purposes. I needed that lat/long in a PHP variable that I could plug into my <gmp-map> center attribute. After some trial and error, I had the code to assign the lat/long to a JS variable. Have I mentioned that JavaScript (browser based) and PHP (server based) don’t play well with each other? This was all new territory for me. I tried writing the lat/long to a server-based file but then couldn’t figure out a way to retrieve it in PHP. I tried to use JSON and can’t even remember what made that worthless. I’m pretty sure I’d considered cookies earlier and failed at my first few attempts, but went back to them out of desperation. It all looked pretty simple but everytime I wrote a cookie, I wasn’t able to retrieve the data. Then one night while I was working late, the data finally showed up. Before I could screw anything up, I saved everything and went to bed. The next day, I couldn’t duplicate that success to save my soul. After more in-depth searching I found out that the data would never show up on the first call. I needed to insert another step, then use the data from a second call. Hallelujah! I could finally get the user’s location and center the map on it.
The feature list is getting shorter. Of course, if you show a map with markers, you need a way to click a marker and have something happen. It was fairly easy to find the attribute to add to my HTML based <gmp-map>. gmp-clickable = “true” But besides making it clickable, you have to tell the site what to do when a marker is clicked. Back to Google searches and, surprise!, everything is coming back with more JavaScript to add event listeners and click events. Great, but the big problem with that is all that code is designed to work with maps created in JavaScript. My map was created in HTML. Here’s the code necessary to make a nice looking map with markers.
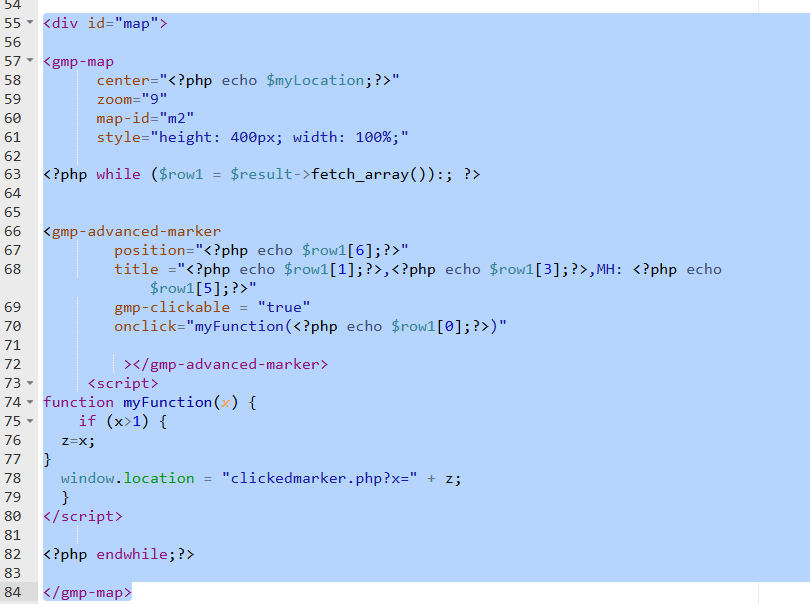
I use PHP calls to my database, then use PHP variables for the advanced markers in a loop for the entire database array. Sure seemed like a lot less work than JavaScript. Anyway, I tried dozens of different ways to use that JS code to get a click event in there. Then I decided to throw a Hail Mary, and added a line to the <gmp-advanced-marker> section. Just below title, I added onclick=”myFunction(code for PHP variable)” After adding the JavaScript function outside the <gmp-advanced-marker> section I was able to do stuff with a clicked marker. BTW, that onclick= didn’t show up in any of my Google searches or in the Google maps platform documentation. Plenty of JS info, just no HTML info. Final note on this feature. In the onclick line, I was passing the PHP variable for the station id. Just for testing purposes, the function just invoked an alert to display the station id. I thought it was working perfectly but the alert would display twice. The first time would show the correct station id and the second time would always display the number 1. I assume it was just displaying a 1 for function success but that was blocking my access to the actual station id. To work around the problem, I added an if clause to the function so if the passed variable was greater than 1, that value would be assigned to a new variable and that new variable would be used for further processing.